If you’ve been hanging onto one Eclipse workspace for the last couple of years, you’ll probably have dozens of projects cluttering up your workspace. If you’re an Eclipse RCP developer, you may be sitting with around 50+ projects easily.
The thing is that you’ll often only work with 1 or 2 at a time, not the whole lot. And sometimes you want a convenient way of only browsing projects belonging to a specific product/feature/layer/any-other-grouping-that-makes-sense. Having all projects in a long list makes it difficult to manage and more difficult to browse.
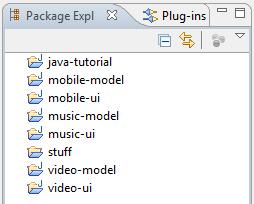
That’s why the Package Explorer and Project Explorer have a nice feature that reduces the clutter and allows you to organise your project into categories that make sense. So instead of the Package Explorer looking unwieldy and flat like this,
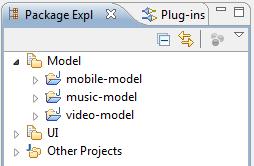
it could look like this:
How to categorise projects
This feature works closely with another Eclipse feature called Working Sets. A working set is just a grouping of resources (ie. files, folders and projects). Each category is just a working set.
To categorise projects, we’ll first create some working sets and then enable the feature in the Package Explorer.
To create a working set do the following:
- Open the Package Explorer (or Project Explorer) and in the View Menu (triangle in the upper, right corner), click Select Working Set…
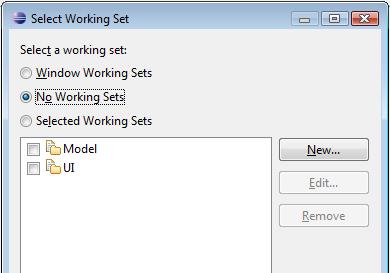
- Click New… in the Select Working Set dialog.
- Select Resource working set type and click Next.
- On the next page select all the projects you want to include in the working set and pick a descriptive name for your working set. Repeat the process for any other working sets you want.
- Click Finish.
Here’s an example of what the working set dialog should look like:
Now to enable the grouping feature. Open the Package Explorer’s View Menu again and enable Top Level Elements > Working Sets. If it’s the first time you do this, Eclipse will prompt you to configure working sets – a way to ask you which working sets to display in the Package Explorer. Select all the working sets you created and click Ok.
You should now see your working sets in the Package Explorer and if you expand it, all the projects you selected will be shown.
Here’s a quick video to give you an example of how this works and looks. In the example, there are 8 projects, 3 belonging to the UI and 3 to the model. The working sets will group them according to UI and Model. There are also 2 projects that are scratchpad projects, so for now they won’t be categorised.
Notes:
- A project can belong to as many working sets as you want, so it can appear in a number of categories.
- You can choose which working sets display in the Package Explorer by choosing Configure Working Sets… from the View Menu and then selecting/deselecting the relevant working sets. NB! This menu item is not available if you’re not in the Working Set layout.
- To get back to the normal view, select Top Level Elements > Projects from the View Menu.
- Any project not assigned to a working set goes to a category called Other Projects. This isn’t really a working set, but a default category that Eclipse assigns to group unassigned projects.
- You can reorder working sets by dragging and dropping them anywhere.
- New projects can quickly be assigned to working sets by either dragging and dropping them onto the working set or right-clicking on the project and selecting Assign Working Sets.
Limitations: Although working sets help you organise resources, any new resources won’t automatically be added to a working set, even if their parent already belongs to that working set. In our case, this means that any new project needs to be explicitly added to a working set, otherwise it will appear in the Other Projects category. Normally you can do this on New Project wizards, so watch out for these.
Some good reasons why you should categorise your projects
Now that you know how to group projects, you might be wondering why you should.
Well, apart from just looking a lot cleaner and less cluttered, it also means that you can act on a group of projects at a time. For example, you can right-click on a working set in Package Explorer and open, close or refresh all projects in that working set. The same applies to Team commands (nice for selective updates).
Another reason is that you can now selectively search only those projects by telling Eclipse to only search certain working sets. Now you don’t have to pick up occurrences in test or scratchpad projects if you don’t want to. There are a host of other Eclipse commands that act only on individual working sets (eg. build, problems, etc).
And the last reason is that now it’s a lot easier to navigate the Package Explorer with the keyboard. Another reason to start learning Eclipse keyboard shortcuts and also impress your colleagues.
Related Tips
- Instantly show a class/file in the Package/Project Explorer in Eclipse
- Use Fast Views to maximise screen space
- The fastest ways to navigate views in Eclipse using the keyboard
- Share Eclipse perspective layouts across multiple workspaces
- More tips on managing views, maximising screen space and navigating and browsing files.


Thank you for the post. I got my answer.
Thank you ! This helped me to keep my workspace clean.
Never knew before about the Resource type working sets.
Works great, unfortunately the [-] button (to “collapse all”) which I constantly click to be able to navigate using the tree leaves me one more click to get back to my list of projects, but still a win overall.
Great! List of projects in my Project Explorer are so many that I needed a way to organize into groups instead of creating one more work space! Thanks.